To create a teacher account in Mobile History Map you should first create an mSchools account here.
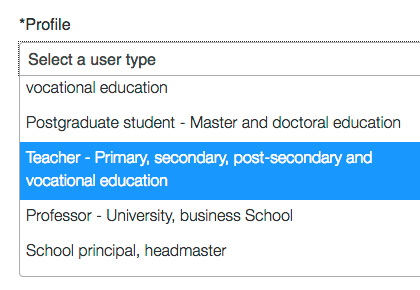
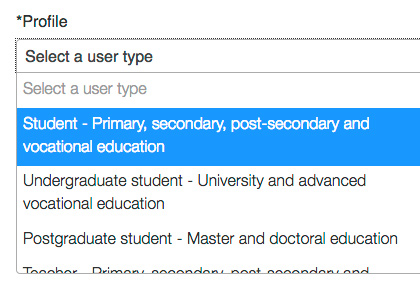
1. During the registration choose teacher from the drop down list.
2. Fill in all the fields of the form
Remeber to register with your institutional e-mail address (example: xxx@xtec.cat). By utilizing this type of e-mail, you will have access to all the mSchools tools.
Before completing the registration you will be notified if the e-mail address utilized is valid.
3. Once you have completed the registration form you should activate your account following a link that will be sent to the email you have registered with.
Once you have activated your account go to https://pre-mhm.itinerarium.com
Now you can start to create your own scenarios!
If you are a teacher on MHM you can you can start creating your own scenarios and initatives that promote project based learning. If you know what project you would like to do with your students on Mobile History Map you can also start it now.
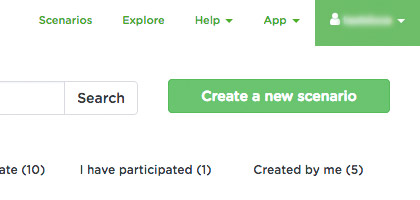
1. CLICK ON “CREATE A NEW SCENARIO”
In order to be able to create scnearios you must be logged-in. Once you have logged in you will be able to create a scenario clicking on the “create a new scenario” button in the library of past scenarios.
2. FILL OUT THE FORM
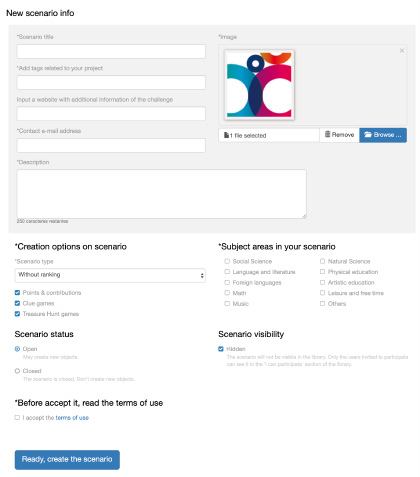
2.1 Begin by filling in the scenario title Title, add a image, indicate a contact email and add the tags that will help other users find your scenario.
2.2 In the description of your scenario indicate the objectives and the chracteristics that the participants should have in mind.
2.3 Add tags that will help other find your scenario from the library more easily, and indicate a contact e-mail, you can also add a external URL to be part of the project.
2.4 Continue by accepting the conditions of use.
2.5 Add a unique and inspirational image of your scenario .
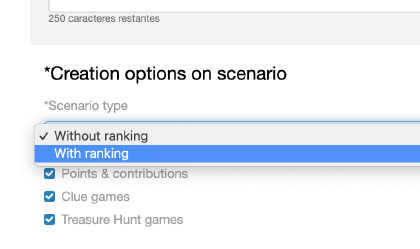
2.6 Choose a type of scenario: With ranking, where you can create quiz games, or without ranking. In this second option, you must specify the objects that you want the participants to find available to create on the scenario.
2.7. Indicate the target audience of your scenario and the thematic areas involved.
It’s important that you select the status of the scenario. If it´s open it will allow the participants to add content. If its closed they won´t be able to add anything more.
Lastly, you will find the option to hide the scenario. This option to hides the scenario from the rest of users.
3. SAVE AND BEGIN TO WORK
Click save and you will find yourself within the scenario. You will always be able to edit any part of the configuration in the scenario.
During the creation of the scenario, in the section of available objects, select the 'Scenario with ranking' option.
Remember that in these types of scenarios you can only create quiz games.
By answering questions you can get points and advance in the ranking.
You can use the app to play and restart the game whenever you want to play again as many times as you want.
From the Advanced Search we can search for scenarios created by any user. To narrow the search we can select if we want to search scenarios by author or schools. If we select the All option, it will search through all existing scenarios.
To be able to add content to a scenario created by someone else you have to go to the information screen of the scenario and select 'I want to participate'.
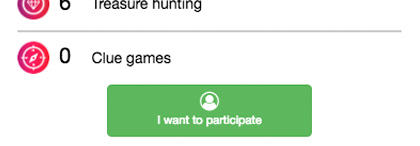
Once you click on this option, a notification will be sent to the creator of the scenario. In order to accept your participation request the creator of the scenario should go to the 'Participants' section at the end of the information page of the scenario.
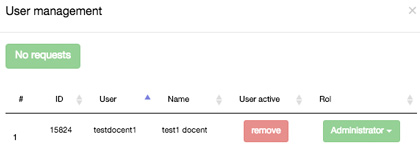
From the participant management screen we can administer the requests and permissions of the participating users.
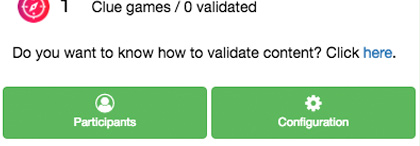
If you are a teacher you can get in contact with the creator of the scenario and request that in addition to accepting your participation in the scenario they give you access as a “coordinator.” With this role you will also be able to access the participation management screen and grant permission requests to users and validate content.
IF MY STUDENTS HAVE YOUR OWN EMAIL
If the students have an e-mail they can register themselves clicking on the option Register.
They will have to select the city and the name of their school during the registration process.
WHAT CAN I DO IF MY STUDENTS DON’T HAVE AN EMAIL
As a teacher you are able to create student usernames for your students to use.
If you have a teacher account by clicking on the user name of the main menu you will find the section Groups/students of the shcool.
Within this section all the student users (primary or secondary students) who have selected your same school during the registration appear. As a teacher of the school you have access to be able to change the password whenever you want.
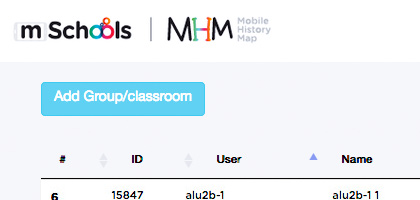
To do this, click on the option Add group/class and you can create the amount you need from users at once.
1. Choose the root of the word.
2. The numbers of users you want to create.
3. Choose the password for these users.
4. Click on add users.
We recommend that you create a limited number of users for each class. It´s not necessary to create a user for each student.
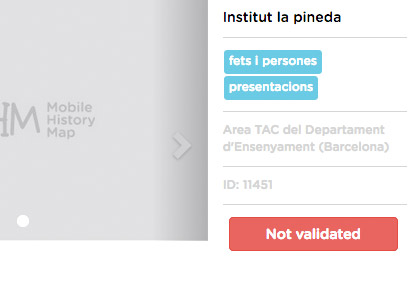
It’s very important that the content created by the students is validated, since only once it’s validated will it be visible to everyone, without needing to login.
The validation of content has to be done by the teacher, the coordinator or the autor of the scenario following these steps:
2- SEE CONTENT- REVIEW AND VALIDATE
Clicking on any object created by your students.
Once it has been revised and if the content seems adequate click on the “NOT VALIDATED” button so that it changes to be shown as “VALIDATED”.
In the list of contributions the titles will be indicated with a check if they are validated.
The quiz game and clue game are validated from the presentation page. The whole game is validated at once.
For the points and contributions each contribution is validated separately.
Since September 2019, only quiz games can be created in the scenarios with ranking.
In addition, in each set of questions you can choose between 2 types of answers: The hanged format or the 3 answers format.
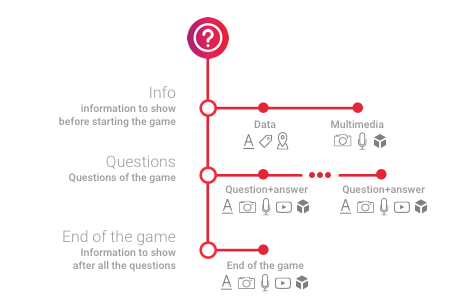
The key of the game consists in designing and asking questions that the user has to resolve based oon observation, análisis or interaction with some element of the place where they are georeferenced.
In the diagram on the right you can see the elements that are needed to create a quiz game and that you should keep in mind while designing it.
Next we will show the steps you should follow to create “quiz game” in MHM.
1. SELECT A NEW OBJECT
Click on “create a new object” to see the drop-down menú and select the “quiz game” option
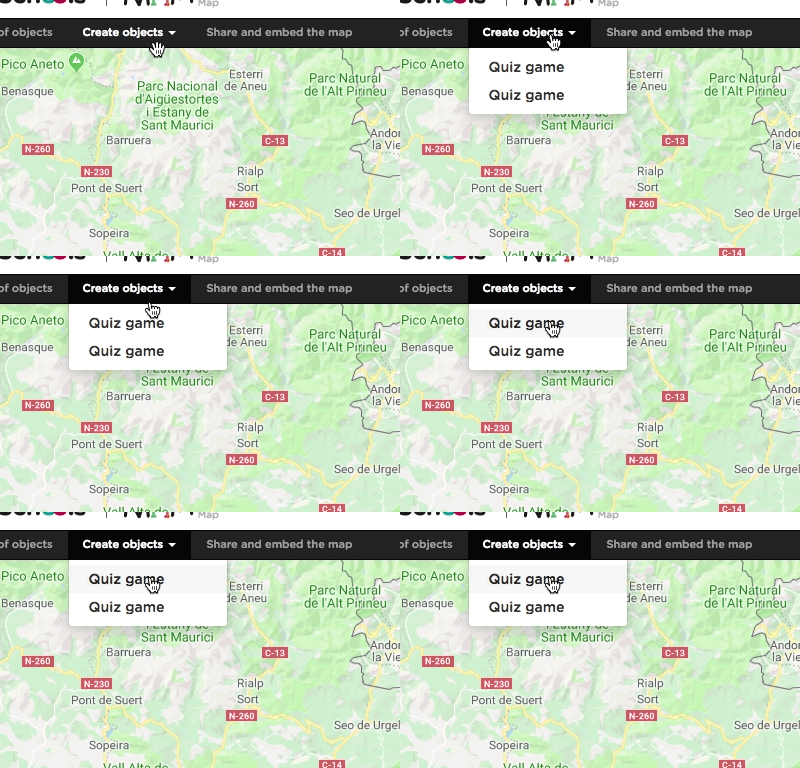
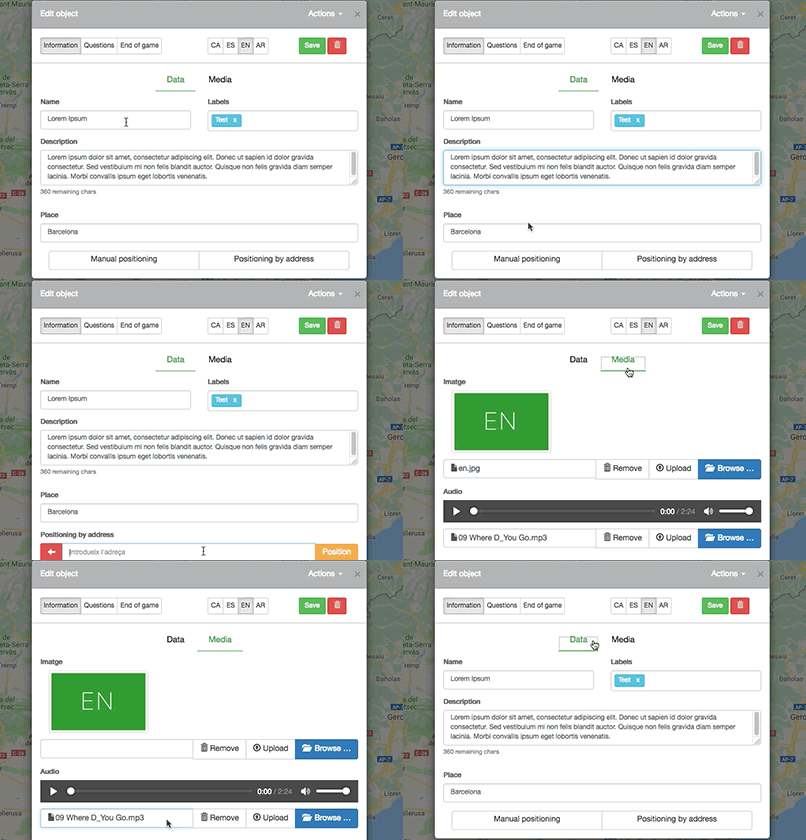
2. FILL IN THE INFORMATION AND MULTIMEDIA OF THE GAME
Select the language you will use to complete the information. If you want the game to be in more than one language you must fill in the information again in the additional language(s).” Seleccioneu l’idioma amb què es completarà la informació. Haureu d’omplir-la tantes vegades com idiomes vulgueu que tingui el joc.
Begin by filling out the home page of the presentation of the game. Remember there are two sections, one is of information and the other of multimedia.
Position the game on the map to be able to continue and create the questions.
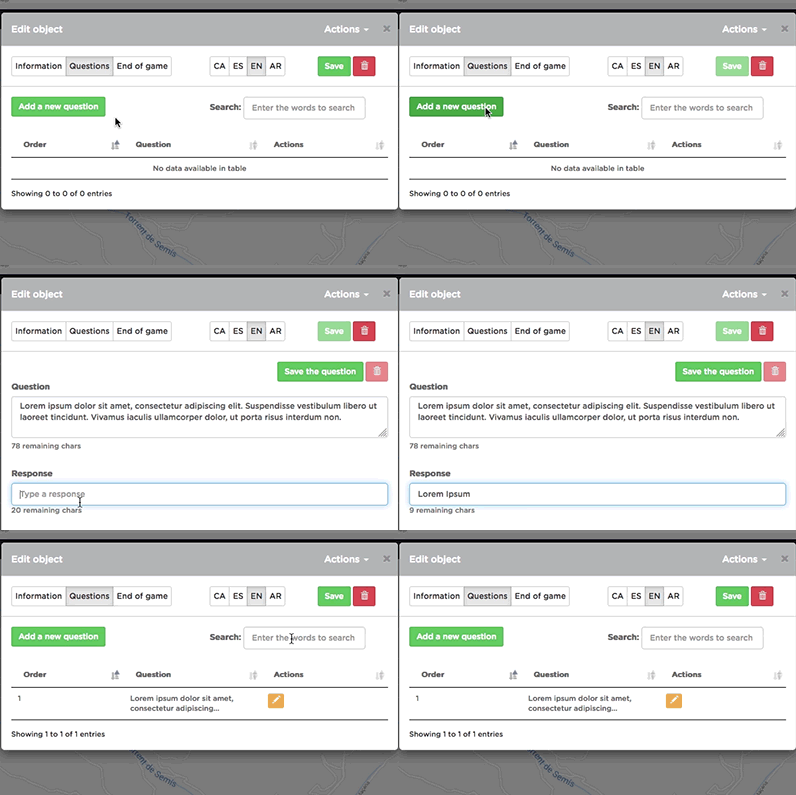
3. ADD THE QUESTIONS
Add the text of the question, the correct response and save the question
Do not forget there is a character limit in both cases, in the question and the response.
You can create multiple questions and put them in order by clicking on their number and dragging them up and down until putting them in the right place.
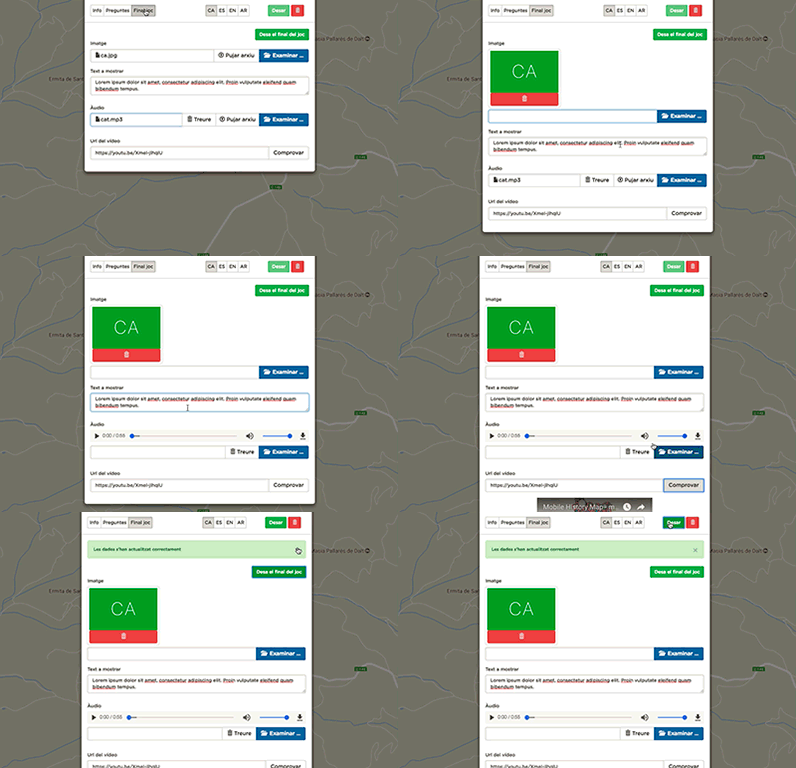
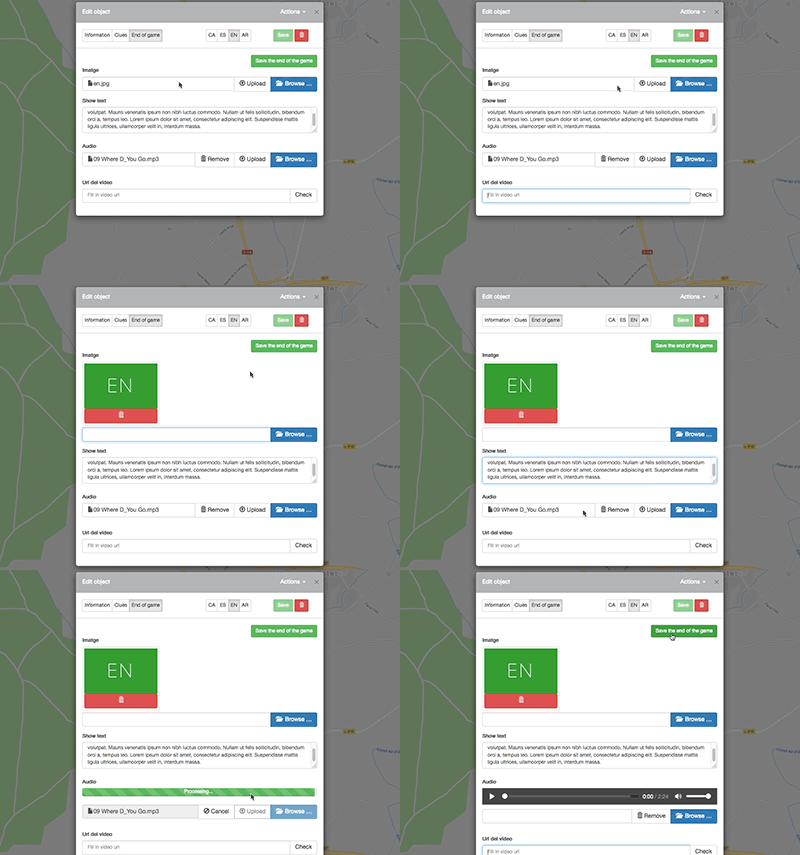
4. ADD THE END OF THE GAME
Lastly, add the final screen of the game.
You can add images, text, audio and a youtube video URL as a prize for guessing the correct answers.
A proposal is to link all the prizes received in the different quiz games to solve an overall puzzle.
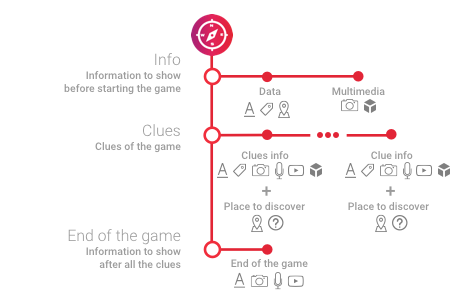
The georeferenced “clue game” is a part of MHM in which the users have to find secret places based on clues with the help of the compass and a distance indicator.
In the diagram on the right you can see the elements that comprise the clue game and that you must keep in mind when creating it.
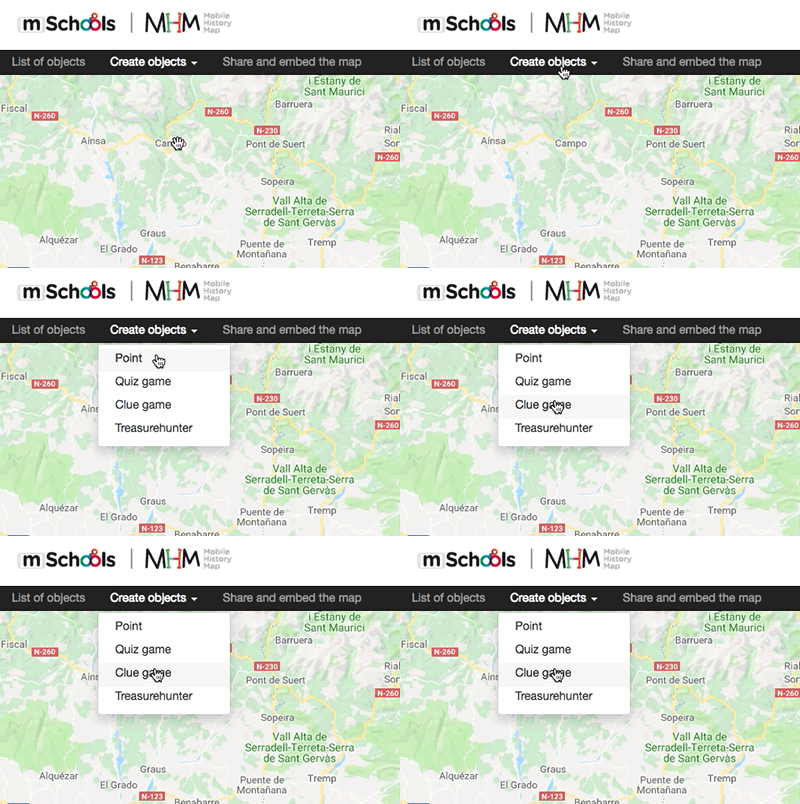
Below we show a summary of the process you must follow to create a quiz game in MHM.
1. Choose the new object.
Expand the menu by clicking on “Create a new object” and choose the “clue game” option.
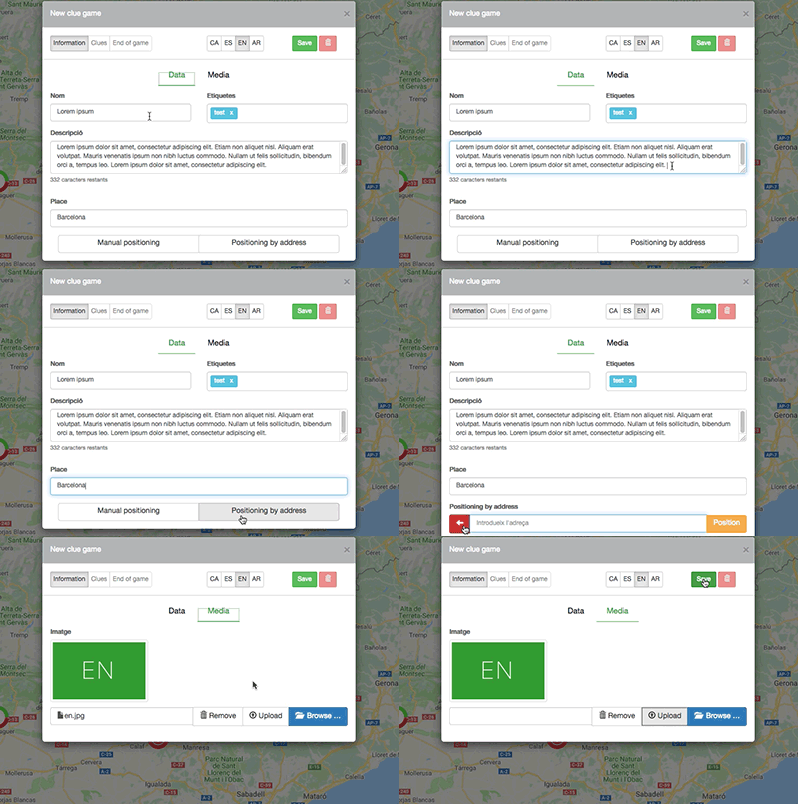
2. ADD THE INFORMATION AND MULTIMEDIA OF THE GAME
Select the language that will be used to complete the information. You will have to fill out the information as many times as languages you want the game to have. If you want the game to be in more than one language you must fill in the information again in the additional language(s).
Begin by filling out the home page of the presentation of the game. Remember there are two sections, one is of information and the other of multimedia.
Position the starting point in the approximate place where the user should be to begin the game.
Save the information and continue creating clues.
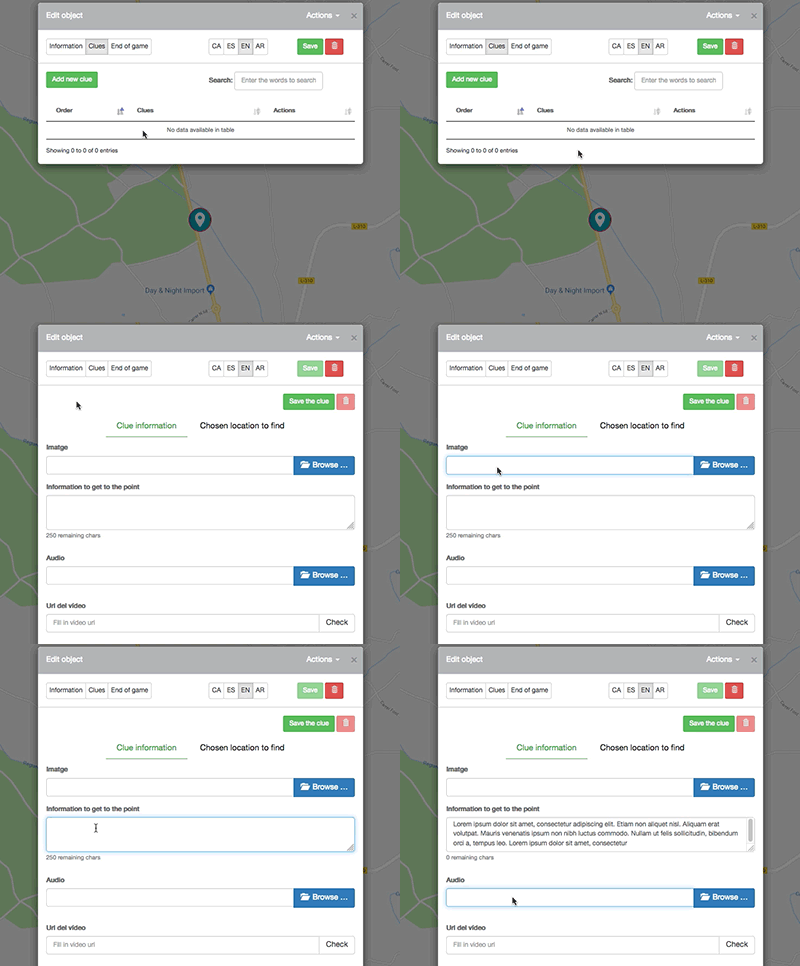
3. Add the clues
To create the clues you must keep in mind there are two tabs; one is information about the clue and the other is about the chosen location to find.
Clue information: Fill in the fields with the information of the clue so that the user is able to find the place.
The place to find: Georeference the place of the object or space to find. Optionally, you can add questions that the user has to solve when they arrive to the place to be able to obstain the clue for the next place to find.
You can create as many clues as you would like. The clues can be reordered, clicking on the number on the left and dragging them up or down to place, them in the right place. Keep in mind that if you use directions like north, or 30 degrees east, to guide the users to the next clue, these directions would be incorrect if the order of clues is changed.
4. ADD THE END OF THE GAME
Lastly, add the final screen of the game, where you can add images, text, audio or a URL of a youtube video as a prize for solving the clues.
As an idea, you can propose the resolution of an enigma for the entire game, that is solved based on the responses that the participant has given to advance from clue to clue. This will help to guarantee that everyone has passed each point of the game.
The MHM treasure hunts work to create games in those which the user must solve different puzles spread out through different geographic points.
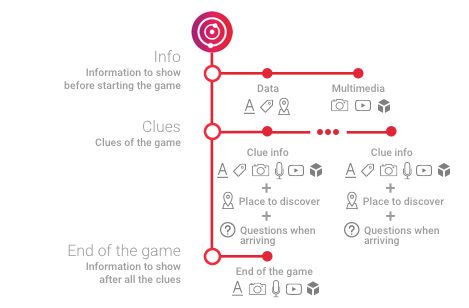
In the diagram on the right you can see the elements that are needed to create a treasure hunt and that you should keep in mind while designing it.
Unlike the quiz, the treasure hunt isn´t a lineal game. From the beginning of the game you can see the position of all the enigmas that it contains. As you get closer to the location of a puzzle, the clue that you must solve by finding the place is activated. Once you arrive to the location, some questions you must solve are shown. You should get close to the maximum number of puzzles possible.
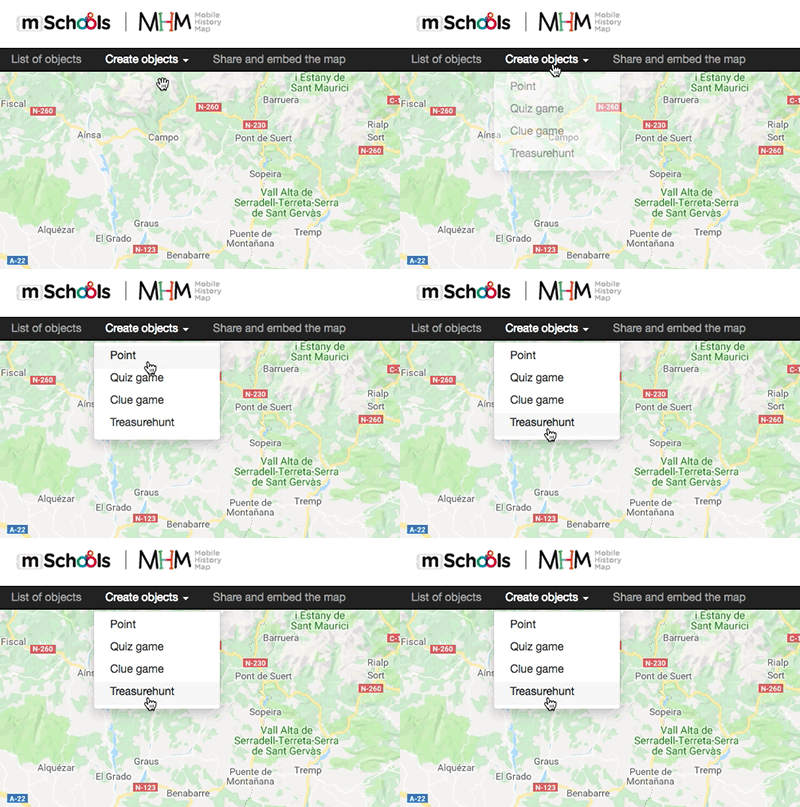
Below we show a summary of the process that must be followed to create a MHM treasure hunt.
1. SELECT A NEW OBJECT
Expand the menu by clicking on “create a new object” and choosing the option “treasure hunts.”
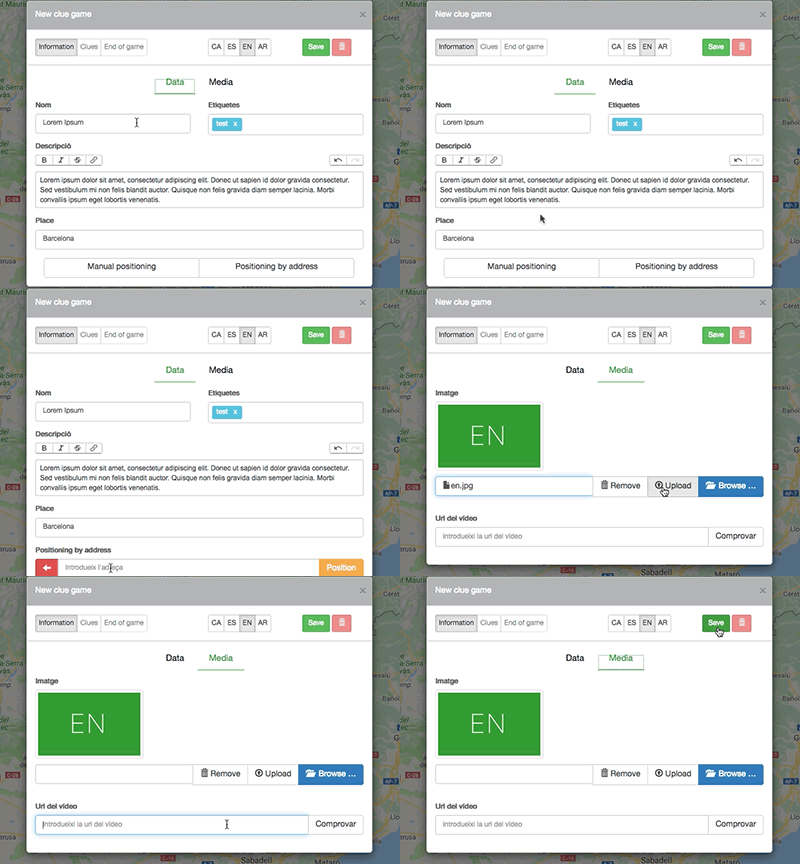
2. ADD THE INFORMATION AND MULTIMEDIA OF THE GAME.
Begin by filling out the home page of the presentation of the game. Remember there are two sections, one is of information and the other of multimedia.
Position the game in the approximate place that the user be at to be able to begin the game. Now click on SAVE and you can continue with the clues.
3. ADD CLUES
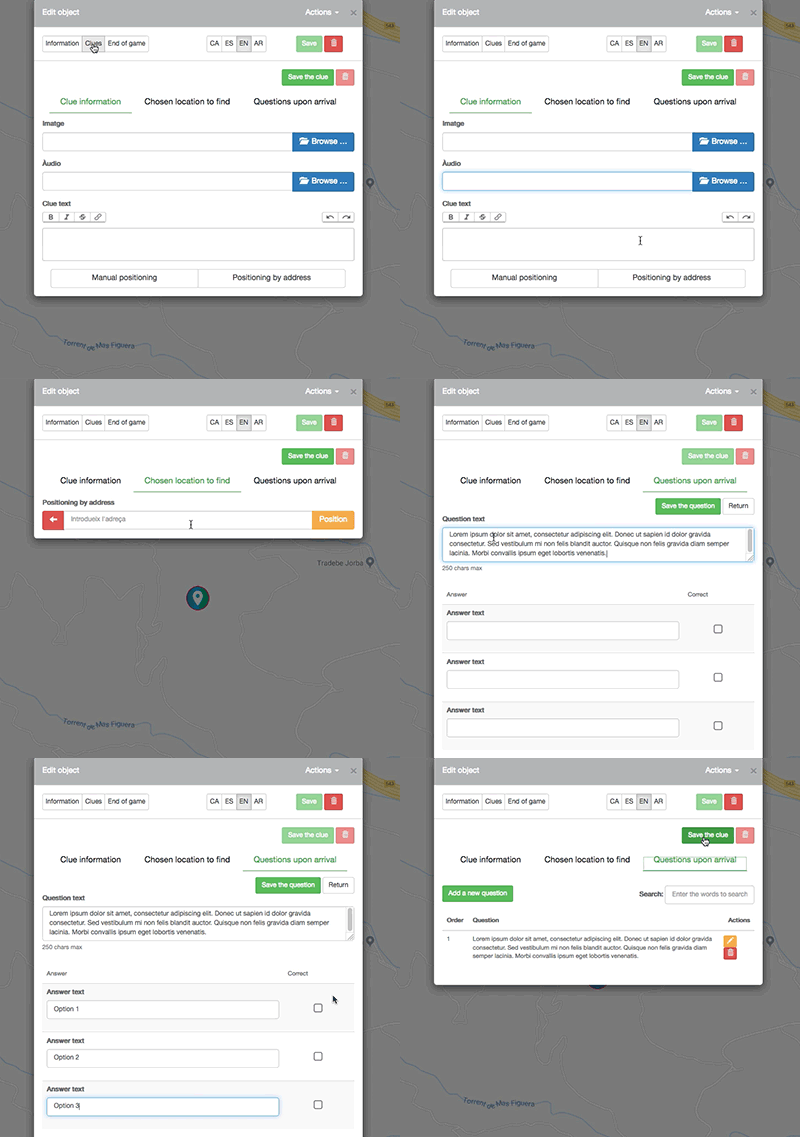
To create the clue we must take into account the 3 tabs; the information of the clue, the place to discover and the questions when arriving.
Clue information: Fill out the fileds with the clue information so that the user is able to discover the place.
The chosen location: Geoposition the chosen location to find.
Questions once you arrive: Add trivia-like questions that the user should solve when they arrive to the place.
It is important to keep in mind that in the object 'treasure hunt' you have to geolocalize both the start of the general game and each clue (in the tab 'clue info') and the goal of each one (in the tab 'Place to discover').
4. ADD THE END OF THE GAME
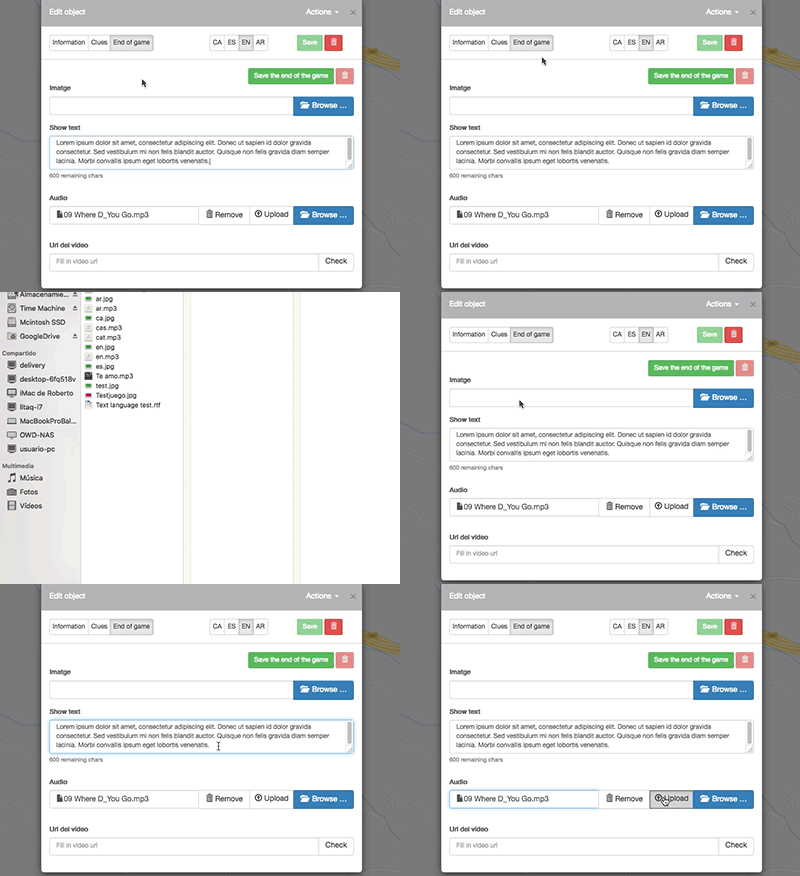
Create all the clues you would like (remember it is not a lineal game) and afterwards add the final screen of the game.
You can add images, text, audio and a URL youtube link.
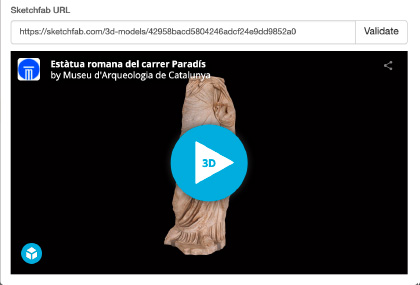
MHM is compatible with Sketchfab 3D models.
To include a 3D model you just have to choose an available model from the Sketchfab website and add the URL of the 'Share' option in the corresponding field.
To ensure link compatibility you can use the 'Preview' function.
CREATION / EDITION OF SCENARIOS OR OBJECTS:
SCENARIOS
- The images associated to the scenarios can not have more than 2MB (2000KB)
- All fields must be entered, except for the "additional information web address"
OBJECTS
Point
- It is mandatory to enter a name and position it on the map.
- The field "Locality" can be used to indicate the town or city to which the point belongs, to be used in possible searches.
Contributions of the point
- The maximum size of each image is 4MB.
- The maximum size of the audio file is 4MB.
- The YouTube video link must be the one that appears in the share option (in the style of https://youtu.be/xxxxxx), not the URL of the page. To see if the link entered can be interpreted correctly, click on the "check" button and the video will be shown if the link is recognized.
- The link "url for more information" should be the complete URL of the referenced page, starting with http: // or https: //
Games
- You must take into account the physical space in which you are going to play. The games have a detection radius of about 20 meters, so you have to place the objects more than 20m between them.
- When relying on GPS it is better to place the objects as far away as possible from the buildings as they cause interference.
- Although you can play without mobile data, we recommend that you use them as they improve the accuracy of GPS.

WEB REQUIREMENTS
These are the minimum versions of the most common browsers for a minimally correct operation. Even so, it is recommended to always use the latest available version of the preferred browser.
- Microsoft Edge browser
- Microsoft Internet Explorer browser from version 11
- Firefox browser from version 53
- Chrome browser from version 60
- Safari browser from version 10.1
- Other browsers compatible with HTML5 and JQuery
ANDROID REQUIREMENTS
- At least version 6.0 of android (Marshmallow)
- Integrated compass and GPS
- Available internal memory of at least 100 MB
IOS REQUIREMENTS
- Minimum version 9.0
Contact Us
If you have any doubt or suggestion, fill out the form


